Iguana – General & Tools
1 Introduction
The General & Tools section of Iguana's CMS gives access to a number of miscellaneous settings and tools. These are:
Licence information
Note the elements Age related, Moods and Automatic reading lists are not standard part of the Iguana application. They require a specific license and must be installed and activated separately. Please contact your account manager for pricing and installation information.
2 System texts
System texts are all sorts of texts that are the user sees in the site. In general, texts can come from three different areas:
1. Content from Rich Text Items (RTI's) : this is content that is defined as Rich Text Items, the content will primarily be textual, but can also contain (links to) images, videos and other types of media
2. Texts inherited from the server : these are texts that are defined in the server-side ILS, and which are “inherited” by Iguana, which receives them as part of the request/response communication (this is purely textual information, which in rare circumstances can contain some minimal formatting)
3. System texts : this is content that is defined in Iguana as texts that should be displayed on pages and that do not fall in the two other categories ; this is primarily textual information, but it can also contain formatting elements (as it is possible to use the Rich Text Editor with all its formatting / styling capabilities to define these texts).
The RTI content (#1) and system texts (#3) are defined via Iguana's CMS. Texts that are inherited from the server (#2) are defined in the WebOpac Preferences.
It will not always be easy to detect whether texts are “inherited” from the server, or whether they are defined as Iguana System texts. This is especially the case for two areas: Search and Personal profiles (the user's personal page).
Each system text is defined for each of the interface languages that are supported in your site. Furthermore, for each text Iguana can maintain three variants: a system-defined variant, a local variant and a profile-specific variant. The system-defined variant is the default variant that is installed together with an Iguana installation. You can override this system default by defining a local variant, i.e. your version of the text. This local version is not overwritten when Iguana is updated to a new version.
The local version applies to all defined profiles. You can override this local version for specific profiles and define profile-specific variants. These versions will not be overwritten when Iguana is updated to a new version.
If no profile-specific version is available for a profile, the generic local version will be used; if that is not available, the system variant will be used.
Note
You may want to suppress a text, i.e. leave it empty. If there is nothing defined for the local value, the contents of the system level text field will be displayed.
So to ensure nothing is displayed, you must either enter a space or ### in the local text field. That way nothing will be displayed in the front-end.
2.1 System texts overview
If you select the option ‘System texts' from the left navigation pane on the Iguana CMS home page, the list of existing System texts is displayed. This display uses a generic element in the Iguana CMS, - the overview page of instances of a specific data type.

The System texts menu instances overview page is described in the chapter Instances overview page of the "Management common workflow" document.
The options on the System texts menu instances overview page are described in the chapter Options on the instances overview page of the "Management common workflow" document.
2.2 System texts properties
2.2.1 System texts
The System texts properties are:

Define these properties as follows:
Id: This is the ID of the system text instance. The combination of the ID and the module property make a system text instance unique.
Module: This is the module of the system text instance. The combination of the module and the ID property make a system text instance unique.
Text (language): This is the actual text that will be displayed if no Local text is defined.
See the next section for a description of how you can change or add the local texts. You cannot change the System text.
2.2.2 Local texts
For each of the interface languages that are maintained for you site, you can define a local text. The local text is displayed if it exists. If not, the system text variant will be displayed. You can also, if needed, define a profile-specific local text, which overrides the default local text.
You can enter the local system text in a textarea field. If the textarea field is not large enough to accommodate the full text, some browsers will automatically add a scroll bar to the area. For other browsers (such as Chrome) you can enlarge the field by grabbing the ‘triangle' icon in the right bottom corner and dragging the field to a bigger size.
For some texts you will want to add formatting to the text. This can best be achieved by defining the text via the Rich Text Editor. You can access the Rich Text Editor via the option. You can then apply the required styling and formatting.
(Alternatively, but less advised, you can also add formatting to the text by entering HTML codes in the textarea field (e.g. ‘<B>This is the text</B>' will display the text in bold : ‘This is the text').
For each site profile that is available, you can, for each of the interface languages that are maintained for you site, define a local text. The profile-specific text is displayed if it exists. If not, the generic local text is displayed, - if it exists. If not, the system text variant will be displayed.
The Local texts properties are:

Define these properties as follows:
Profile: This is the Site profile for which you define a Local text. Select “Default Profile” to define a generic Local text, or select another profile to define a profile-specific Local text. (The profiles in the dropdown list that have a asterisk after their name are the ones that have a Local text defined for them.)
Text (language): This is the actual text that will be displayed.
3 User and Role management
For its user and role management, Iguana interfaces with Argus. This application is not Iguana-specific and is not described as part of the Iguana documentation.
4 Media manager
Iguana allows you to manage the media that you are going to use in your site(s). Iguana handles this by interfacing with CKFinder, “a powerful and easy to use Ajax file manager for web browsers” (see http://ckfinder.com/ for more information). The media manager allows you to upload files for later use in your site, and to organize the uploaded media in folders.
Depending on configuration, there may be other ways to upload and organize the available media resources, but doing this via the Media manager is by far the most intuitive and easy-to-use option.
Feature overview
The main features of the Media manager are:
· It allows you to upload content and organize it in folder structures.
· Quality image thumbnails are displayed, which makes it easy to find media.
· Images can be inserted into documents as thumbnails, which are created automatically.
· You have full control over all aspects of the media manager: you can create, rename, copy, move and delete folders and files.
· The interface is lightweight and easy to use through its deployment of context-sensitive menus for files and folders, its usage of image thumbnails and its overall intuitive approach.
· The Media manager is fully integrated with the Rich Text Editor.
Supported file types
By default, the media manager supports a wide range of resource types. These are grouped in three categories: files, images and Flash objects. Supported file extensions are:
|
Files |
7z,aiff,asf,avi,bmp,csv,doc,docx,fla,flv,gif,gz,gzip,ico,iso,jpeg,jpg,mid,mov,mp3,mp4,mpc,mpeg,mpg,ods,odt,pdf,png,ppt,pptx,pxd,qt,ram,rar,rm,rmi,rmvb,rtf,sdc,sitd,swf,sxc,sxw,tar,tgz,tif,tiff,txt,vsd,wav,wma,wmv,xls,xlsx,xml,zip |
|
Images |
bmp,gif,jpeg,jpg,png,avi,iso,mp3,ico |
|
Flash objects |
swf, flv |
4.1 Main options
4.1.1 Accessing and using the Media manager
There are two ways to access the Media manager. The first way is via the navigation menu pane: click on the menu option Media manager in the category General & Tools.
The second way to access the Media manager is via the Rich Text Editor. The following workflow describes how you can actually use the Media manager to select an image (as an example) and include it in a Rich Text Item.
1. Open the Rich Text Editor. (The Rich Text Editor is accessible on multiple locations in the CMS, e.g. from the Content section of Rich Text Items, from the Profile sections of Site profiles, and others).
2. If you want to include an image, click on the button (![]() ). This will open a popup that allows you to define the details of the Image (location, width, height, etc.).
). This will open a popup that allows you to define the details of the Image (location, width, height, etc.).
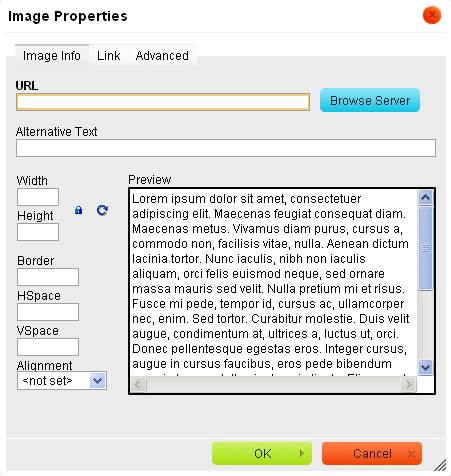
3. The popup form features a button. Click on this button. This will open the Media manager.
4. You can now browse the folder structure and select an image (there are three ways to select an image: by double-clicking on the image, by using the Select option from the context menu and by using the Select as thumbnail option from the context menu). See below for more information.
5. The selected image is now included in the Rich Text Item (a preview is shown in the popup form mentioned in steps 2 and 3 of this workflow). If you submit the form (click on ) the selected image is inserted into the Rich Text Item.
4.1.2 Media manager display areas
The Media manager display consists of three areas:
· At the left of the page you find a navigation tree structure, which allows you to browse through the available folders
· At the top right of the page the main options are displayed: Upload, Refresh, Settings, Maximize/Minimize and Help
· The main part at the right is used to display the actual resources.
The Media manager has various top-level folders:
· Files
· Images
· Flash
· CSS themes
· System images
· Basket
The first three folders correspond to the supported file type groups, as described above. The last folder, Basket, is specifically defined for temporary storage of files.
Depending on the context in which the Media manager is opened, you may see all of these folders, or only a subsection of it. If you e.g. open the Media manager to select an image and copy it to a Rich Text Item, only the Images and the Basket folders will be displayed. See below in this document for more information on the practical use of the Basket folder.
CSS themes contains the standard themes supplied on installation (see the document on Structure and Style for more information) plus any of your own themes you may have created.
System images makes the standard /img folder available in the Media Manager (see also section 4.3 below).
Please note
|
|
Please note that you cannot copy any file type to any of the folders. The Files, Images and Flash folders will only accept files with an extension that is included in the list of supported file types for that folder. See the list of supported file types in the overview in an earlier section of this document. |
After selecting the Media Manager option from the General & Tools menu, the following screen will be displayed:

4.1.3 Main options: uploading files & settings

The main folder options are:
: Allows you to upload files to the Media manager. You can use the button to select a file and the option to upload the selected file.
: Refreshes the page.
: Allows you to define a number of view, display and sorting options.
: This option will display the folder dialogue window full screen. You can then use the option to go back to the small display.
Please note
|
|
Please note that limits may apply when you upload a file. |
4.1.4 Managing folders and Navigation menu options
You can manage the folders via the context menu, which is activated via a right-mouse click on an element in the folder tree structure.

The options are:
: Allows you to create a new folder under the folder for which you activated the context menu.
: Allows you to rename a folder.
: Allows you to delete a folder.
A special folder is the Basket folder, which allows you to temporarily store files. You can copy files to the Basked folder by dragging & dropping them in the folder. The files that are copied into the Basket can then be accessed from the context (right-click) menu in the Navigation menu.
: Allows you to copy files that are stored in the Basket folder. This will copy the files and will not remove them from their original location.
: Allows you to move files that are stored in the Basket folder. This will move the files and will remove them from their original location.
: Use this option to compress selected files into a .zip file.
: Use this option to download the zipped files.
4.1.5 Managing media resources
You can manage individual media resources via the context menu that is accessed by a right-click on a file.

The options are:
: The file will be selected and inserted into the context that invoked the Media manager (e.g. if you are in the process of selecting an image to include this into a Rich Text Item). See section 5.1.1 (Accessing and using the Media manager) for a detailed workflow.
: This option is identical to the option, but in this case a thumbnail will be created and inserted into the context that invoked the Media manager.
: View the file. This will open the file in a new browser window.
: This will download the file to a folder on your computer (typically this will be the \Downloads folder).
: This will resize the image to a smaller size. You can choose from a number of predefined sizes (e.g. 90x90, 120x120 or 180x180), or define your own custom size. You can decide to resize the existing image, or create a new image with the new size. You can either lock the width/height ratio, or decide not to do so. You cannot use the Resize option to enlarge files to a bigger size.
: Give the file a new name.
: Delete the file from the folder.
You can also drag & drop files to move them to another folder. If you drag a file to a different folder and drop it on the folder in the left navigation menu, the Media manager will ask you whether you want to Copy () or Move () the file. Select the appropriate option.
Please note
|
|
Please note that not all these options may be available for all supported file types. |
4.2 Rights, permissions & limits
4.2.1 Rights & permissions
A number of Media Manager functions imply that you have the correct rights to e.g. create folders on your file server, delete them, upload data to those folders, etc.
These rights depend on settings in the operating system (Windows, Unix, Linux). If you do not have the correct rights to use specific features in the Media Manager, please contact the person in your organization who manages the permission settings on the file server.
4.2.2 Limits
Limits may apply to the maximum file size if you upload files to the file server. The maximum file size can be set at two levels: for the Media Manager itself, and for the underlying PHP environment. Please note that the latter setting overrules the Media Manager setting.
If you encounter issues with regard to the maximum file size when uploading files, please contact Infor.
4.3 Standard images and locations – CSS
The standard themes package that comes with an Iguana installation contains specific images for availability display of items (ok.gif and notok.gif).
The availability icons will be looked for in the images directory for the theme in Iguana (CSS\css\themename\images\ ).
If you want to use your own images for availability display, they must be stored in the correct directory.
The CSS themes are also listed in the Media manager. Keep in mind:
· Only files with the following extensions are listed/allowed to be uploaded: .css, .png, .jpg, .gif, .ico, .bmp (as these are relevant to CSS themes, something like .pdf for instance is not)
· File permission settings are not handled by the Media manager, so depending on the system they might have to be adjusted manually before being able to update files here.
· There is NO undo with the Media manager in use (CKfinder). Delete a file, and it is gone.
· The Media manager in use (CKfinder) allows editing of some text files, such as .css files, so a theme's CSS file can be edited (if file permission allows) directly from the Media manager.
5 GeoTagging mashups
Iguana supports GeoTagging, i.e. the ability to visualize metadata on a map. GeoTagging is ”the process of adding geographical identification metadata to various media such as a geotagged photograph or video, websites, SMS messages, QR Codes[1] or RSS feeds and is a form of geospatial metadata. These data usually consist of latitude and longitude coordinates, though they can also include altitude, bearing, distance, accuracy data, and place names.” (from http://en.wikipedia.org/wiki/Geotagging, December 10, 2011).
In version 2 of Iguana, GeoTagging is only supported for a mashup of Branch location data with Google Maps.
5.1 GeoTagging instances
You can define multiple GeoTagging instances (i.e. you can have multiple implementations of maps mashups in a single site profile).
A GeoTagging instance has the following properties:

Define these properties as follows:
Unique id: This is the unique identifier of the GeoTagging instance. The unique id has the format.
In use: You can indicate whether or not a map mashup instance is in use.
Provider: At the moment, only Google Maps is supported as a provider.
Data source: At the moment, the only supported data source is Locations. You can select which locations (as defined under Locations) are part of this definition by moving them to the box on the right. But until these Locations have co-ordinates (see below in section 7.1 how to define co-ordinates), there will be nothing on the map.
Title (English): The wording of the mashup. The title is for internal purposes only. In the Iguana front-end, it is not the title of a widget container that holds the Google Maps mashup.
6 Locations
Location data is used to store information about specific (physical) locations of a library. The information contains address information, geotagging information, and others.
The stored Locations data is used in a number of environments:
· The information can be used as content for GeoTagging instances, e.g. for a Google Maps mashup.
· The information is used as content for the mobile app that is supplied together with Iguana. The location information is used to fill the “Branches” option within the mobile app.
6.1 Location instances
You can define as many Location instances as you need.
A Location instance has the following properties:

Define these properties as follows:
Unique id: This is the unique identifier of the Location instance. The unique id has the format.
In use: You can indicate whether or not the Location is in use. If not in use, the Location will not be included in Google Maps mashups or mobile app displays.
Location: The location as defined in the back-end V-smart or Vubis Smart ILS. Select the location from the list of valid locations.
Address: The address of the Location, expressed in a single line.
Email address: The email address that is associated with the Location.
Telephone: The telephone number of the Location.
Fax: The fax number of the Location.
Opening hours: The opening hours of the Location, expressed as follows:
- The weekdays are separated by semi-colon (;), in which Monday is the first and Sunday the seventh day.
- If there are multiple ‘open periods' per day, these are separated by commas (,).
- Start time and end time of an ‘open period' are separated by a hyphen (-).
- Start time and end time are expressed as HH:MM (hours:minutes).
- Example: 13:00-17:00,18:00-21:00;10:00-12:00,13:00-19:00;10:00-17:00;10:00-17:00;10:00-12:00,13:00-17:00,18:00-21:00;10:00-17:00 reads as:
- Monday = 13:00-17:00,18:00-21:00 = open from 1pm to 5pm and from 6pm to 9pm
- Tuesday = 10:00-12:00,13:00-19:00
- Wednesday = 10:00-17:00
- Thursday = 10:00-17:00
- Friday = 10:00-12:00,13:00-17:00,18:00-21:00
- Saturday = 10:00-17:00
- Sunday = [nothing, i.e. not open on Sunday]
Coordinate (lat): The geographic latitude coordinate of the Location. You can enter this by hand or (preferably) by clicking on the button. The button will fill in the latitude, provided the address field contains an existing address.
Coordinate (lng): The geographic longitude coordinate of the Location. You can enter this by hand or (preferably) by clicking on the button. The button will fill in the longitude, provided the address field contains an existing address.
Inherit closed days from Vubis: If set to Yes, the mashup with Google Maps will take into account the closed days settings as defined in the V-smart or Vubis Smart back-end ILS.
Title (English): The name of the Location.
Display note (English): A note that is related to the Location.
7 Miscellaneous tools
The Miscellaneous tools option groups a number of tools that allow you to better manage your Iguana resources in case of issues.
The following option are available:
- : You can use this option to re-index the Rich Text content that is stored in the Iguana CMS.
- : To improve performance, Iguana stores a number of HTML page structures as “intermediate data” once they have been created. You can use this option to remove this intermediate (cached) data.
|
|
These options do not need to be used under normal circumstances. However there may be cases in which they can resolve specific issues. Only use these options when advised to do so by Infor staff. |
7.1 Re-indexation
To re-index all CMS content, proceed as follows:
1. Check the “Re-index all Rich Text Items” checkbox.
2. Click on the button.
In most cases the re-indexation will take less than a few minutes to complete. In smaller sites, it will most likely only take a few seconds to complete.
7.2 Removing intermediate data
To remove intermediate data, proceed as follows:
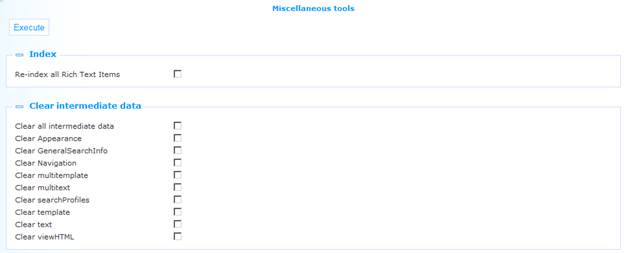
1. Check “Clear intermediate data” checkboxes of the types that you want to remove from the server-side cache.
2. Click on the button.
Removing intermediate data should, under normal circumstances, take up almost no time.
|
|
Please use this option only when instructed to do so by Infor. The different types of intermediate data are not explained in this documentation, as removing selective types of intermediate data will only very, very rarely be relevant. |
8 Interests
Please see the document on Interests for a full explanation of this subject, including the structure of the files that can be imported.
This section allows for the import / export of Interests files.
If you select the option ‘Interests' from the left navigation pane on the Iguana CMS home page, the following screen will be displayed:
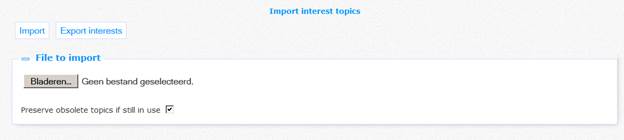
Use the button to select the file you want to import. Optionally set the parameter Preserve obsolete topics if still in use. If the parameter is OFF, existing interests will be removed. If the parameter is ON, any interests in this xls/tab delimited spreadsheet source will be added to the existing set.
Next click on the button to start the actual import. If there is a problem with the file, a message will appear:

Optionally you can export the error information via the additional button , which appears after a failed import.
Otherwise a message appears the import was successful:

You can use the button to export the existing interests information. The standard dialog window of your browser for opening/saving a file will appear.
9 Age groups
This allows for the definition of one or more age groups. Based on age groups, users can be linked to specific profiles.
If a user then logs on, the linked profile is determined based on his/her age and subsequently applied.
9.1 Age group definitions
If you select the option ‘Age groups' from the left navigation pane on the Iguana CMS home page, the list of existing Age groups is displayed. This display uses a generic element in the Iguana CMS, - the overview page of instances of a specific data type.
An Age group definition has the following properties:

Define these properties as follows:
Unique id: This is the unique identifier of the age group, for internal purposes only. You cannot modify it.
From age: This is the lower limit of the age group.
To age: This is the upper limit of the age group. Users up to and including this age will fall within the range.
In the above example the ‘Butterfly' profile will be applied to all children from the age of 6 up to and including the age of 8.
Linked profile: Select the profile that must be applied to this age group from the dropdown list.
Title (English): The wording of the age group, for internal purposes only.
10 Specific moods
In addition to ratings and reviews there is another mechanism for users to express their opinion: with a specific mood.
The moods are attached to site profiles. Once a user is logged in Iguana and goes to a full record page he/she will see the option:
“Click here to select your mood about this book”
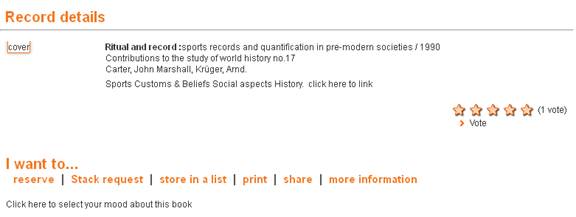
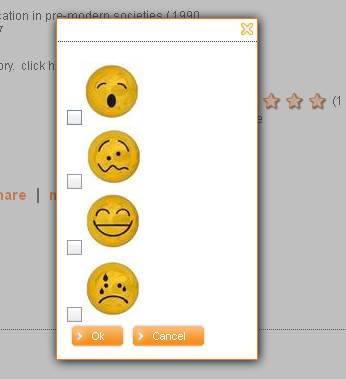
Clicking the link will open a pop-up where the moods can be selected/modified:
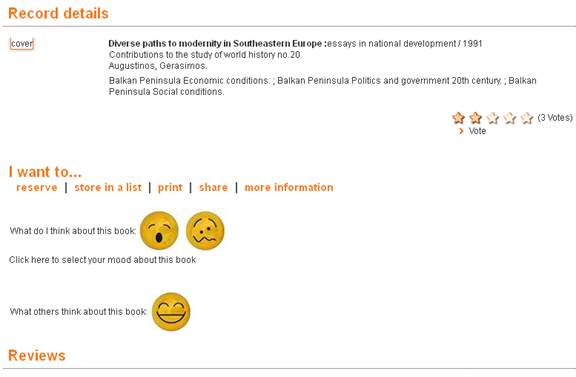
For a title that has moods specified it might look similar to:
10.1 Specific mood definitions
If you select the option ‘Specific moods' from the left navigation pane on the Iguana CMS home page, the list of existing Specific moods is displayed. This display uses a generic element in the Iguana CMS, - the overview page of instances of a specific data type.
A Specific moods definition has the following properties:
Define these properties as follows:
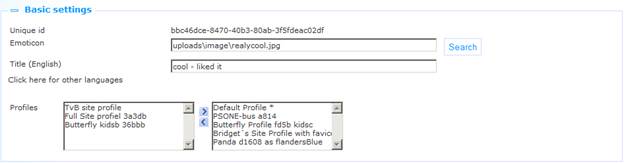
Unique id: This is the unique identifier of the mood, for internal purposes only. You cannot modify it.
Emoticon: Add the emoticon that must be used to denote this particular mood. Use the button to select the images; this will open the Media Manager, and you can now select the image that you want to add
Title (English): The wording of the mood, for internal purposes only.
Profiles: Select one or more profiles that can use this mood by moving them to the right.
11 Reading lists
Iguana supports the creation and use of reading lists.
There are multiple ways to create a new reading list:
(a) Reading list can be created manually by users; depending on their choice, these lists can be visible only for the creator or also for other users (see below for the effects of the “types”)
(b) Reading lists can be created automatically
Both options are described in more detail below.
Reading lists have one of the following types:
|
Private |
only the creator has read/write access to the list |
|
Personal |
the creator has read/write access, others have read access |
|
Reading lounge |
reading lounge list, only members have read/write access |
|
Moderator |
only lounge moderators have write access |
|
Shared |
everyone has read/write access to the list |
|
Shared restricted |
everyone has read/write access to the list but a user can only delete items that (s)he has added personally |
|
Automatic |
created automatically by the application; always private |
The following lists can be created automatically:
|
My ratings (documents rated) |
list is automatically filled with documents that the user has rated |
|
|
My reviews (documents reviewed) |
list is automatically filled with documents that the user has reviewed |
|
|
Stuff I like |
list is automatically filled with documents that the user has rated with a rating of 7, 8, 9 or 10 |
|
These lists, if they do not yet exist for the user, will be created on the fly (one time; afterwards they should be updated if the user adds or edits a rating or a review).
If allowed by the library (via a parameter in the CMS; see below) it is possible to manually add records to the auto-generated lists.
Note
It is possible to allow direct display of the personal reading list of a user., without going through the user activities reading lists. This can be done with:
.../.../www.main.cls?sUrl=search#savelist=Personal
If the user is logged on his/her personal reading list is shown directly. Else the login window is displayed and the list is shown after logon.
11.1 How does it work?
Below is a description of the workflow for creating reading lists via the Iguana front-end as well as the workflow for adding titles to a list.
11.1.1 Creating reading lists
If a teacher creates a list for pupils, he/she can decide if the pupils will be allowed to modify the content of the list or not (if he sets the list type to “Moderator”, then the pupils cannot modify the content; if he sets the type to “Reading lounge”, the pupils are allowed to modify the content of the list). Once the type has been selected, “the reading group” for which the list will become available can be set.

The Reading groups can be defined for specific borrower categories (see the CMS parameters below) from User Activities – Reading groups:
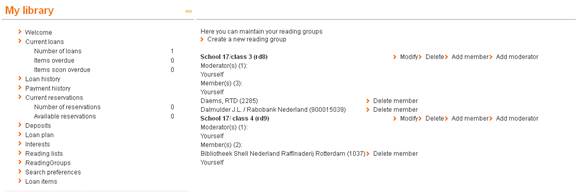
From here a new reading group can be defined and after that moderators/members can be added.
In order to add a moderator to a reading group (a person that will have write access to lists attached to the reading group) the userid or user name is required:-

The members can be added based on barcode id, name, school/class or from a save list:

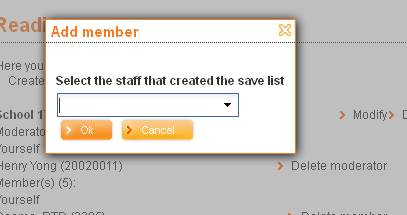
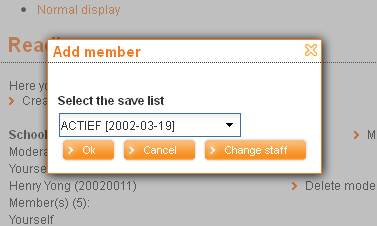
If the user selects the option “Add from save list” the user will be asked to select the staff member that created the list and after that the specific list:
Please note that for V@school only pupils of the current teacher can be added as members of a reading group.
11.1.2 Adding titles to reading lists
Based on “Reading list typology” the overview of the reading lists can be presented as text or visual containing book covers similar to:

Adding content manually to a reading list
In the full display of a reading list there is a menu option
Manually add content to the list
This option allows a user to add content to a reading list that cannot be found in the library catalogue.
Selecting the option presents a form similar to:
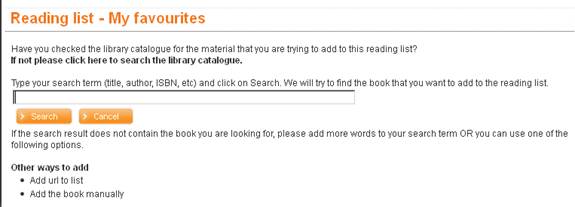
The search in the above form will be performed in all the Federated Search resources that are selected in the CMS-Reading list parameter:

The search results will be presented similar to:

Clicking on a title results in a pop-up, asking the user to confirm that he/she wants to add the title to the current reading list:
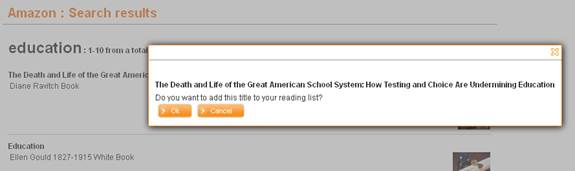
Clicking OK will add the title to the reading list.
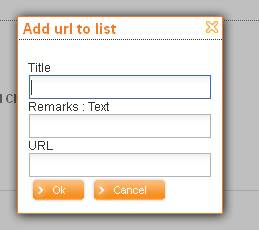
If the title cannot be found using the federated search the user has the option to add a title/website manually using the options:

That will present forms similar to:

Please note that all the records that are added manually to the list will be added in the database defined in the CMS-Reading lists.
11.2 Reading list parameters
If you select the option ‘Reading lists' from the left navigation pane on the Iguana CMS home page, the list of existing Reading lists is displayed. This display uses a generic element in the Iguana CMS, - the overview page of instances of a specific data type.
Here a set of parameters can be defined that can be linked to one or more site profiles. These are:

You determine which profiles have reading lists available, what types of reading lists are available, and which borrower categories can access these reading lists. You can also define here which of the automatic ones are to be maintained.
11.2.1 Basic settings
The basic settings are:
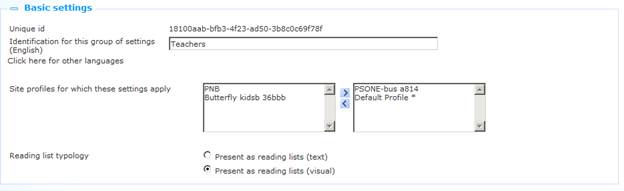
Define these properties as follows:
Unique id: This is the unique identifier of the reading list, for internal purposes only. You cannot modify it.
Identification for this group of settings (English): The name of the reading list parameter set.
Site profiles for which these settings apply: Select one or more profiles that can use this reading list definition by moving them to the right.
Once a site profile is linked to ‘reading list parameter set', this site profile can not be linked to another ‘reading list parameter set'.
Reading list typology: Select the presentation of the contents of a reading list (see section 11.1.2 for an example of visual presentation).
11.2.2 Reading list types
The type settings are:
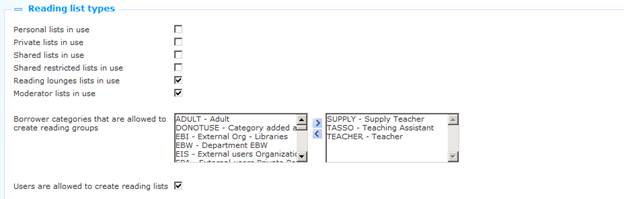
Define these properties as follows:
<type> lists in use: Indicate which of the possible types can actually be used for this parameter set.
Borrower categories …: Indicate which borrower categories are allowed to create reading groups by moving them to the right.
Users are allowed to create reading lists: If this parameter is OFF users cannot create their own lists. However, automatically generated lists may be available.
11.2.3 Automatic reading lists
The settings for automatic generation of reading lists are:

Define these properties as follows:
Automatically create <My …list>: Indicate which list(s) must be generated automatically.
Users are allowed to manually add records: If this parameter is OFF users cannot add content to automatically created lists. Only the automatically generated content will be available to them.
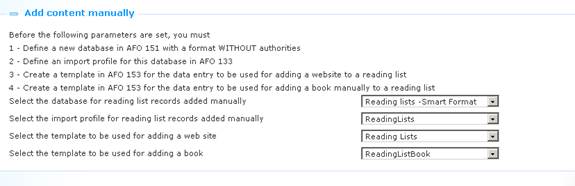
11.2.4 Add content manually
Please note that certain actions must be performed in the back-end library system in order to be able to deal with manually added content for reading lists.
The settings for manual generation of reading lists are:
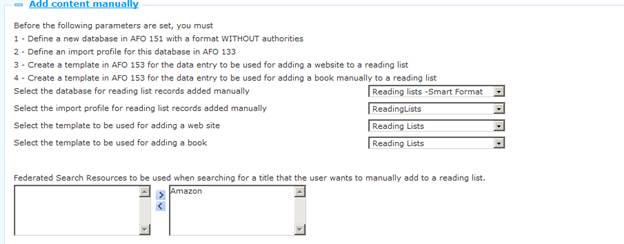
Define these properties as follows:
Select the database for reading list records added manually: Select the database that has been defined for this purpose in AFO 151 from the dropdown list.
Select the import profile for reading list records added manually: Select the import profile that has been defined for this purpose in AFO 133 from the dropdown list.
Select the template to be used for adding a web site: Select the template that has been defined for this purpose in AFO 153 from the dropdown list.
Select the template to be used for adding a book: Select the template that has been defined for this purpose in AFO 153 from the dropdown list.
Federated Search Resources: Indicate which resources can be used for federated searching by moving them to the right.
The resources listed in the table on the left hand side can not be added interactively. Please contact Infor for assistance with setting this up.
· Document control - Change History
|
Version |
Date |
Change description |
Author |
|
1.0 |
August 2011 |
Creation |
|
|
1.1 |
September 2011 |
Added sections on System texts and Media manager |
|
|
1.2 |
September 2011 |
Added information on profile-specific texts |
|
|
1.3 |
December 2011 |
Added additional on General settings |
|
|
1.4 |
December 2011 |
Added further information on General settings; added introduction of GeoTagging section |
|
|
1.5 |
December 2011 |
Added information on Locations |
|
|
1.6 |
January 2012 |
Added header |
|
|
1.7 |
January 2012 |
Reviewed |
|
|
1.8 |
January 2012 |
Added section on Rights, permissions & limits |
|
|
2.0 |
May 2012 |
Reformat for online help doc |
|
|
3.0 |
December 2012 |
Added screen shots, guidelines, more explanations; reformatted; new features: age groups, specific moods, reading lists; new option for Geotagging locations; amended supported file types |
|
|
3.1 |
April 2014 |
Parameter maintenance moved to separate section; Interests import/export; personal reading list access; Argus instead of Sentinel |
|
|
3.2 |
August 2014 |
Empty system texts |
|
|
4.0 |
April 2016 |
Various new options for Media Manager |
|